
This article or section contains information that is out-of-date.
|
| This article may need cleanup to meet quality standards.
Please help improve this if you can. The Discussion page may contain suggestions. |
Please help improve this if you can. The Discussion page may contain suggestions.
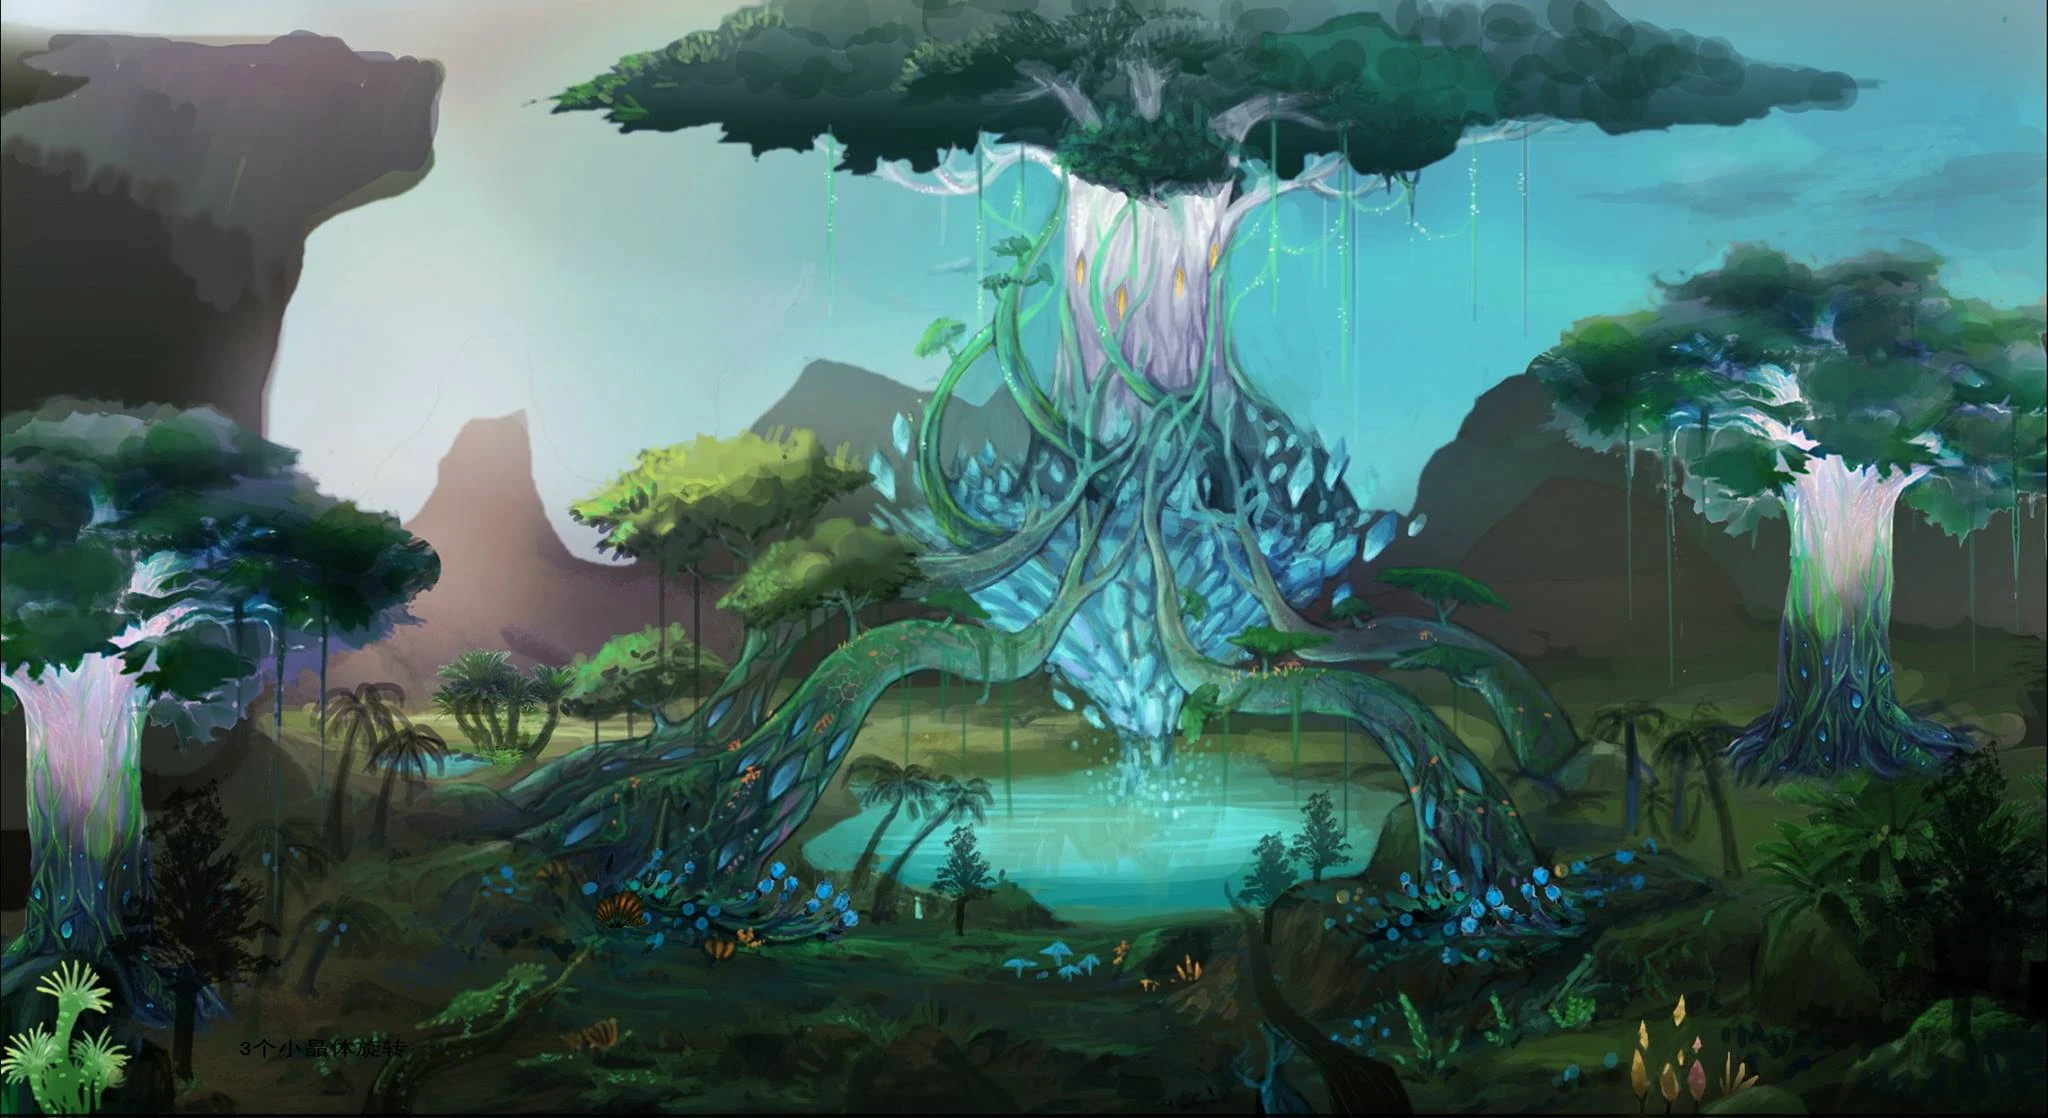
The Order of Corona inside Morai.
Morai is an area introduced to Perfect World in the PWI Descent expansion. It was originally available for players that had reached level 95, but the level requirement was lowered to 85 in the Neverfall content update. Morai starts with the storyline of the destruction of the Elysium Village in Perfect World. The area offers an extensive map and many rewarding quests and a sect system that has three distinct orders: Corona, Luminance, and Shroud.
Story[ | ]
Morai was once a realm that was sealed off to prevent vicious Wraiths from invading Perfect World. Following the destruction of the Elysium Village, the door to the realm of Morai was opened. In the current times, players can enter Morai once they have reached level 85 to obtain gear and a variety of other items from the Orders.
Map[ | ]
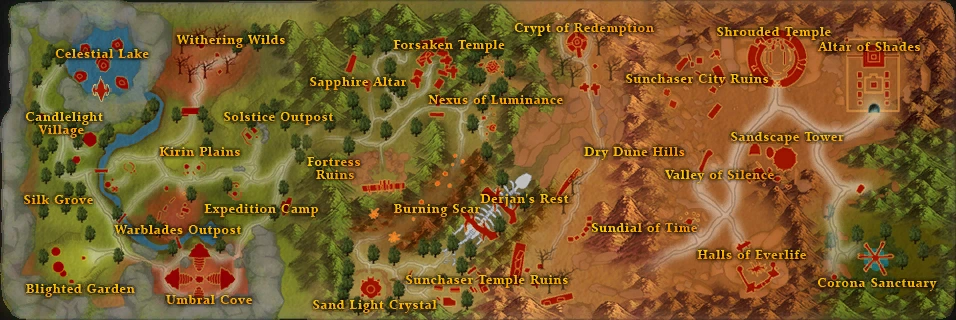
Introduction[ | ]


The starting area in Morai.
The world of Morai is a vast, dynamic land of adventure and intrigue. Upon arrival, you will be tasked with determining the source behind the destruction of Elysium Village and sudden mobilization of Wraiths in Morai. On your travels, you'll come across others - those who would help you, and those whose only intent is to destroy you. Choose your allies wisely, for the road ahead is perilous. Morai is available to players that have reached level 85. As soon as you reach the level, a pop-up quest will appear asking you
Once you have reached level 85, a pop-up quest will appear asking you to check out the situation at Elysium Village. The quest will lead you into accessing Morai. You will enter Morai on an island floating in the air above Celestial Lake, at the top and far left side of the map.
Messenger of Time NPCs[ | ]
If you wish to exit Morai talk to any of the teleporters that exist in towns. If you wish to re-enter Morai talk to Messenger of Time Woyo who can be found in every major city:
- In north Archosaur city (549 668), across from Watcher of the Earth by a big tree.
- In south Archosaur city (561 635), on the opposite side of the building where the south Banker is located.
- In Etherblade city (433 886), Next to the Elder of Etherblade
- In Lost City (242 647), to the rear far left side of the pavilion where the Elder of the Lost is standing
- In Plume city (334 418), off to the right and the back side of the teleport NPC
- In Raging Tides city (667 122), near the Teleport NPC in the center of the city.
- In Tellus city (382 221), bottom center within the city.
Morai Quests[ | ]


Landscape of Morai.
If you are new to Morai your first quest series will be given at Candlelight Village. If you head west and jump off the island you can fall into the lake below and swim to the shore to a path on the west side of the lake, the mobs in the lake are not aggressive. Once on shore follow the path to Candlelight Village. If you stay on the path mobs will not attack you.
The quest line will reward you with a decent set of armor which you can use up to endgame, if you don't have anything better. The quest line also rewards you with a lot of EXP and helps your familiarize with the area. After the initial quests are done there are a few daily quests that will keep you coming back.
By taking these daily or weekly quests you will earn a large amount of experience, Reward Prizes and also something specific to Morai; Influence and Prestige which you can gain after joining an Order (Luminance, Shroud or Corona) and are used to get goods, all-class pets, armor and more. The different Orders have different items to earn.
Crazy Stone[ | ]
The Crazy Stone quests continue in Morai once characters have reached level 100. The player has the choice of choosing whether to collect Common elemental shards or Average elemental shards, with the latter offering a higher reward. The Stone Collector, Merchant, and Jewelcraftsman NPCs are located at each Order.
For Corona the Stone Collector (466,513) is by the Banker who is a little ways southeast of the Corona leader.
The Merchant (473,517) is little ways off the right of the leader.
The Jewelcraftsman (No Jewelcraftsman could be found near Corona)
For Shroud the Stone Collector (447,584) is between the Morai Jewelcraftsman and Banker.
The Merchant (446,585) is across the Morai Jewelcraftsman.
The Morai Jewelcraftsman (447,585) is between the Blacksmith and Stone Collector.
For Luminance the Stone Collector (355,579) is by the base of the leader's platform.
The Merchant (357,581) is off to the right when at the Stone Collector and facing the leader.
The Morai Jewelcraftsman (357,577) is before the Stone Collector next to the Banker.
Daily Divine Quests[ | ]
To get the daily Divine quests you must belong to one of the Orders of Morai.
To start go to the leader of your Order and take the "Visit: the Divine Emissary" quest that he offers. This quest has you go to the Divine Emissary NPC who has the Divine quests.
The Divine Emissary will usually offer you several quest to choose from but you will only be able to take 2 of these quests unless you get the Token: Divine Order of Longevity which will unlock the list of quests.
Sometimes he will only offer you 1 purple quest which is worth more and has a different reward.
The Timed Quest[ | ]
You are given 1 hour to finish and turn-in this quest.
The timed quest is not given by the leader of the order but by a different NPC in each of the Orders.
In Corona it is given by NPC: "Corona Stargazer Kin Sol".
In Shroud it is given by NPC: "Shroud Knight Synea".
In Luminance it is given by NPC: "Luminance Knight Inuwen"
At the NPC select "Quest Related" and you will be offered a single daily quest. There seems to be 4 or 5 rotating quests for this (Warriors, Wizards, Cutgo and 2 types of Buzzards).
All these quests seem to be on the west side of the map. To save money and time I use the teleport NPC to port out of Morai, and then port right back into Morai where you will be on the Northwest side of the map. Then I fly to to the quest mobs to do the quest and then return to the teleport NPC where I entered and use the Morai transport to Teleport to the farthest point East. Then I fly the short distance to turn-in the quest. I usually have 30 minutes to spare, so I sometimes do a Divine quest that is a little bit farther from the base than I wanted to go. If you do this watch the clock and don't lose your timed quest.
Deity's Messenger (Jintao) Quest[ | ]
This is a once a day quest to acquire Emperor's Letter. This item can be turned into 2 Holy Pills at either of any leader of the orders:Corona King Kisian, Shroud prophet Mogo or Luminance Lord Gugg and will cost 30 influence per trade in.
Jintao is an NPC sitting in a funny wheelchair driven by a mouse that roams the road that goes across the map from east to west and back again. The trick is finding him and then since he does not stop you have to turn in the quest to him on the run. Once you succeed the Emperor's Letter will be in your inventory. The Jintao NPC can be tracked through a player-made application here.
Wraithslayer's Missive Quest[ | ]
You will only get this quest once a week from the leader of the Order that you belong to.
The quest requires you to have a squad with one member from each of the orders (Corona King Kisian, Shroud prophet Mogo or Luminance Lord Gugg).
Once you accept this quest you will be committed to completing it or losing the quest after it expires in 24 hours.
Once you take the quest a Wraithslayer's Missive (item) will show up in your inventory. Link this item to the squad leader to signify you have taken the quest then head to the dungeon entrance located at the Sandscape tower - red entrance (448 549).
How to set up the Wraithslayer's Missive Quest[ | ]
The leader of the squad has a special role that may determine if the quest works or fails. If you are the leader of the squad you will have to stay at the quest NPC until all squad members have the quest. It is a good idea to get members from each of the other Orders before you fill the squad. The squad can have as many as 8 members but must have at least 1 from each of the 3 Orders of Morai, including yourself.
You must make sure that all squad members including yourself have taken the quest or picking the quest (taken by the squad leader) will fail, swapping leadership of the squad and passing it back to repick it once all members have the Wraithslayer's Missive will solve this issue.
To do this, have each squad member link the Wraithslayer Missive the quest gave them to you in a squad or PM chat message. Once all squad members have taken the quest you can head for any of the order's leaders and pick the quest "Kill Atuin Together"
All squad members will receive the quest in their quest log, make sure everyone has this quest before you kill the boss or the whole quest might fail. After the boss is dead the quest is done and you will automatically receive the reward of a large amount of experience, Spirit and Influence of your Order. If the boss is killed before all members are inside the dungeon, you can just wait for Atuin to respawn after a few minutes.
Quest description: Atuin has mastered the techniques of all three Orders, and seeks to combine them within the Blighted Chamber to become all-powerful. To defeat him, you will have to form a squad of members from all three Orders. To enter the Blighted Chamber, go through the red portal under Sandscape Tower.
Rewards:
Gold: 0, Exp: 1000000, SP: 131800, Reputation: 0, Prestige Gained 500
Mayhem in Morai[ | ]


A Crystal Guardian for Corona
This is a weekly event that occurs every Saturday from 19:00 to 22:00. The quest "Valor" is given automatically upon entering Morai while the event is active. For the three hours it runs, players from each Order will be given a buff that prevents EXP or item loss on death while in PK Mode, and encouraged to defeat players from their opposing Orders. Players will also not gain a Red Name for killing others this way.
There is also an option for PvE players to participate by destroying three Crystal Guardians that appear just outside of the other two rivaling Order's camps. Additionally, an Order Scout (named according to the Order aligned) will appear during this event within each Order's headquarters to not only turn in the quest upon completion, but to also grant a few buffs at a small cost. The event reward grants additional Prestige and Influence.
Sir Cuddlesworth[ | ]
As a bonus players are able to obtain a Sir Cuddlesworth pet egg from Sir Cuddlesworth. The bear spawns at one of two possible spawn spots at arandom time during the event. Watch for this message: "Winnie appeared near the reflection time."
After it spawns it walks around and talks for about 3 minutes. After that time he vanishes and drops 1 sir cuddlesworth pet egg. Its free to pick by everyone as the mob can’t be killed, so watch for others trying to loot (remember killing others is a way of securing the egg for yourself).
3 Sir Cuddlesworth eggs can be combined to make 1 Lord Cuddlesworth egg
Spawnpoints:
Slightly north of Corona Sanctuary (465 531) and slightly south of Shrouded Temple (446 570) [1]
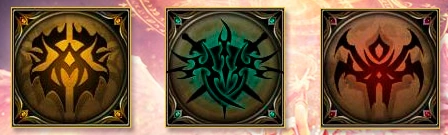
The Orders of Morai[ | ]

The three Orders of Morai: Corona, Luminance and Shroud.
An Order is a type of Sect that you join in Morai.
There are 3 Orders: Corona, Luminance, and Shroud.
Joining and Leaving an Order[ | ]
It is advisable to review all the reward items such as Armor of each Order before choosing which one to join.
- Once you choose an Order the order's name will appear above your character's name.
- Once you join an Order, you will not be able to leave that order for at least 7 days.
- When you leave an Order, you will lose some of the Prestige and Influence you earned from the Order you left.
- After you leave an Order, you will have to wait 24 hours before you can join another Order.
In the surrounding area where the leader of the Order is located there is a Mailbox and several NPCs; a Banker, Teleport, Merchant, Blacksmith, Morai Jewelcraftsman, Stone Collector, and other NPCs.
Order of Corona[ | ]
| “ | Welcome to Corona! We strive to make our world a better place for all. Providing for the good, punishing the evil, and helping the weak are our tenets here. I sense in you a kindred spirit. Perhaps you can stay awhile and learn from us. | „ |
| ~ Corona King Kisian |
The Order of Corona is located at the Corona Sanctuary, at the bottom-right of the map.
Important NPCs:
- Corona King Kisian (472 529), Leader of Corona
- Emissary of Corona (473 ,524), Divine Quest Dispatcher
- Corona Taomaster Kyno (472 520), Basic Supply
- Corona Stargazer Kin Soz (473 522), Advanced Supply and Daily Quest
- Stone Collector (467 514), provides level 100+ Crazy Stone quest
Note: The Teleporter and other craft NPCs are a distance from the Corona Leader.
Basic Supply[ | ]
Corona Taomaster Kyno offers the Basic Supply crafting service, which includes Morai teleport scrolls, jades, and more.
180 Prestige is required to be able to craft any items in the Tier 1 tab.
| Item | Influence | Notes |
|---|---|---|
| Teleport Scroll Pack: Corona | 5 | Contains 10 Teleport Scroll: Corona |
2000 Prestige is required to be able to craft any items in the Tier 2 tab.
| Item | Influence | Coins | Notes |
|---|---|---|---|
| ★★Arcanic Muse Boots | 80 | 525,000 Silver Coins | Arcane Boots |
2500 Prestige is required to be able to craft any items in the Tier 3 tab.
| Item | Influence | Coins | Notes |
|---|---|---|---|
| ★★Arcanic Muse Bracers | 80 | 525,000 Silver Coins | Arcane Wristguards |
1500 Prestige is required to be able to craft any items in the Tier 4 tab.
| Item | Influence | Notes |
|---|---|---|
| Reputation Jade | 5 | Used to gain 80 Reputation |
| Experience Jade | 5 | Used to gain 100,000 Experience |
| Spirit Jade | 5 | Used to gain 22,600 Spirit |
Advanced Supply[ | ]
Corona Stargazer Kin Soz offers the Advanced Supply crafting service, which includes equipment and more.
3000 Prestige is required to be able to craft any items in the Tier 1 tab.
| Item | Influence | Coins |
|---|---|---|
| Little Dino Egg | 340 | 10 Silver Coins |
4000 Prestige is required to be able to craft any items in the Tier 2 tab.
| Item | Influence | Coins | Notes |
|---|---|---|---|
| ★★Arcanic Muse Cap | 110 | 714,000 Silver Coins | Arcane Helmet |
4500 Prestige is required to be able to craft any items in the Tier 3 tab.
| Item | Influence | Coins | Notes |
|---|---|---|---|
| ★★Arcanic Muse Pants | 110 | 714,000 Silver Coins | Arcane Leggings |
5000 Prestige is required to be able to craft any items in the Tier 4 tab.
| Item | Influence | Coins | Notes |
|---|---|---|---|
| ★★Arcanic Muse Robe | 110 | 714,000 Silver Coins | Arcane Robe |
| Corona Emblem | 1 | 10 Silver Coins | Used to reshape or reform Corona equipment |
| ★★Blades of Bloodlust: Sky | 300 | 1,764,000 Silver Coins | Daggers |
| ★★Seraphic Shooter: Sky | 300 | 1,764,000 Silver Coins | Bow |
| ★★Celestial Skyshaker | 300 | 1,764,000 Silver Coins | Saber |
| Exclusive Sparkle Rune | 10 | 10 Silver Coins | Maximum Physical Attack +130 for 60 minutes when imbued into weapon |
| Red Cosmos Egg | 600 | 924,000 Silver Coins | Mount |
| Daevas | 900 | 3,150,000 Silver Coins | Human only Aerogear |
| Watcher of the Skies | 900 | 3,150,000 Silver Coins | Winged Elf only Aerogear |
6000 Prestige is required to be able to craft any items in the Tier 5 tab.
| Item | Influence | Coins | Notes |
|---|---|---|---|
| Spirit: Eden | 20 | Increases Attack and Defense Levels for 30 minutes in Eden | |
| Spirit: Torment | 20 | Increases Attack and Defense Levels for 30 minutes in the Seat of Torment | |
| Spirit: E. Universe Advanced | 20 | Increases Attack and Defense Levels for 30 minutes in Advanced Endless Universe | |
| Immolation Order | 60 | 1 Silver Coin | Used in Quicksand Maze |
7000 Prestige is required to be able to craft any items in the Tier 6 tab. service.
| Item | Influence | Coins | Notes |
|---|---|---|---|
| Ex. Heaven's Edge Charm Box | 10 | Contains 100 Exclusive Heaven's Edge Charms that increase Physical Attack by 220. |
Order of Luminance[ | ]
Welcome to the Order of Luminance! We strive to bring justice and order to the world, and the only way to do that is to take control. We have banded together to shine light upon the darkness in this realm, to bring about a new order of righteousness.
Map Location Name: Nexus of Luminance
Important NPCs
- Luminance Lord Gugg (353,579), Leader of Luminance
- Emissary of Luminance (357,578), Divine Quest Dispatcher
- Luminance Tactician Mur (352,579), Basic Supply
- Luminance Knight Inuwen (351,580), Advanced Supply and Daily Quest Dispatcher
Equipment:
- Dual Axes
- Dual Swords
- Spear
- Light Armor Set
Order of Shroud[ | ]
We of the Shroud strive to discover all the secrets of the universe. There is a wealth of knowledge hiding in the night: Ripe for those who do not fear the dark.
Map Location Name: Shrouded Temple
Important NPCs:
- Shroud Prophet Mogo (447,590), Leader of Shroud
- Emissary of Shroud (446,584), Divine Quest Dispatcher
- Shroud Craftsman Yurin (448,598), Basic Supply
- Shroud Knight Synea (446,590), Advanced Supply and Daily Quest Dispatcher
Equipment:
- Magic Sword
- Soulsphere
- Heavy Armor Set
Prestige and Influence[ | ]
Prestige and Influence are two stats that are used to accumulate points earned when you complete Morai quests and can be turned in to specific Morai NPCs to purchase rewards such as Armor, weapons, pets and different utility tokens.
The points earned in Prestige and Influence can only apply to the Order that you are presently a member of and those points can only be spent for the rewards offered by that Order. If you want rewards from another Order you must become a member of that Order and accumulate Prestige and Influence points from that Order's quests.
When you quit an Order you will loose some of the Prestige and Influence that you earned in that Order (5% at 1st order you leave) and you will be subject to the time restrictions before you can join another Order. You have to wait 24 hours before you can join a new Order.
Morai Dungeons[ | ]
Order Statistics[ | ]
Contributing to an Order through quests will award characters with two different types of points - Prestige and Influence. These points can be used to purchase various items in each order. Each order has separate Prestige and Influence, meaning that points earned in the Shroud Order cannot be used for the Luminance or Corona Orders, for example. Prestige and Influence for each Order can be viewed by opening the Character Info window with the C key, and then clicking on the "Order" button at the bottom of the window.
Note: There is a glitch in the Order window where the Prestige and Influence values are labelled incorrectly; the top value is for Prestige, while the bottom value is for Influence.
Character Attributes[ | ]
These stats are listed on the bottom of the character Status window and have yet to be discovered or implemented.
Warding Level - This seems to be related to a Defensive ability. (Estimated to be .9 of a Defense Level)
Slaying Level - This seems to be related to an Attack ability. (Estimated to be .9 of an Attack Level)
Teleports[ | ]
Teleporting around Morai is done in short leaps across the map with a cost of 2500 Silver Coins.
Morai Teleport NPCs can teleport you back to Perfect World for free but you always end up in Elysium Village in front of a NPC, Teleporter Mon Suer (535,252) where you can teleport to other cities or places on the Perfect World map.
To return to Morai from Elysium Village go to NPC, Spirit Loyan (537,250) a short distance away from Teleporter Mon Suer
So this is a cheap way to cross the Map when you are short on time:
While in Morai at a teleport NPC, let say at Corona, and you need to go to west side of the map to kill mobs. Teleport back to Perfect World map then go to the NPC, Spirit Loyan (537,250) a short distance away and teleport back into Morai which is always on the upper west side of the map. Going East in morai you must use the Morai teleports or fly which is best for long distances.
- Teleporter Shia Sol (226 584) on an island in Celestial Lake on the map
- Teleporter Swane Key (207 566), Candlelight Village
- Teleporter Ruzon (246 532) Warblades Outpost
- Teleporter Rua (278 561) Solstice Outpost
- Teleporter Veru (313 576) Sapphire Altar
- Teleporter Monis (311 515) Sand Light Crystal
- Teleporter Hoki (391 518) Unseen Gate
- Teleporter Shin (443 550) Sandscape Tower
- Teleporter Mionia (465 515) near Corona Sanctuary
- Teleporter Siobalm (351 577) at Nexus of Luminance
- Teleporter Raio Kin (450 585) at Shrouded Temple
Bosses and Mini-Bosses[ | ]
Dark Radiance (level 100). Level 100 is in the Blighted Garden near the front of the building that is there. Players can solo this boss but will take you a long time and there are several roaming mobs that will attack you while you are fighting. It is better to have help if just to keep the other mobs off your back while you are fighting the boss.
Mutated Wu Hen (4,950,360 HP) and Mutated Wu Mehan (5,950,360 HP)
These are located close together at the giant skeleton on the map (357,538).
They are relatively tough to kill and have mobs around them that will pester you while you try to kill the boss.
| Regions | |
|---|---|
| Perfect World | |
| Realms | |